Python 代码编译运行过程(1):编译过程
简单总结一下 Python 代码编译运行过程
前言
阅读 Pytorch 源码时涉及到 Python 代码编译执行相关的内容,为了便于理解,简单学习了 Inside The Python Virtual Machine 的部分内容,本文内容主要来自于此,相关细节请参考原文。
简单总结 Python 程序编译过程的步骤
- 将源代码转化为 AST(抽象语法树, abstract syntax tree)
- 生成符号表(symbol table)。
- 从 AST 生成 code object。
源代码转化 AST
每当从命令行执行 Python 模块时,都会将模块文件的内容分解为一个个合法的 Python tokens 或者发现语法错误时进行报错。
1
2
3
4
5
6
7
8
9
10
11
# ==== test.py ====
a = 1
b = 1
c = a + b
print(c)
# ==== test.py ====

from tokenize import tokenize
f = open("./test.py", 'rb')
for t in tokenize(f.readline):
    print(t)
打印结果如下:
1
2
3
4
5
6
7
8
9
10
11
12
13
14
15
16
17
18
19
20
21
TokenInfo(type=62 (ENCODING), string='utf-8', start=(0, 0), end=(0, 0), line='')
TokenInfo(type=1 (NAME), string='a', start=(1, 0), end=(1, 1), line='a = 1\r\n')
TokenInfo(type=54 (OP), string='=', start=(1, 2), end=(1, 3), line='a = 1\r\n')
TokenInfo(type=2 (NUMBER), string='1', start=(1, 4), end=(1, 5), line='a = 1\r\n')
TokenInfo(type=4 (NEWLINE), string='\r\n', start=(1, 5), end=(1, 7), line='a = 1\r\n')
TokenInfo(type=1 (NAME), string='b', start=(2, 0), end=(2, 1), line='b = 1\r\n')
TokenInfo(type=54 (OP), string='=', start=(2, 2), end=(2, 3), line='b = 1\r\n')
TokenInfo(type=2 (NUMBER), string='1', start=(2, 4), end=(2, 5), line='b = 1\r\n')
TokenInfo(type=4 (NEWLINE), string='\r\n', start=(2, 5), end=(2, 7), line='b = 1\r\n')
TokenInfo(type=1 (NAME), string='c', start=(3, 0), end=(3, 1), line='c = a + b\r\n')
TokenInfo(type=54 (OP), string='=', start=(3, 2), end=(3, 3), line='c = a + b\r\n')
TokenInfo(type=1 (NAME), string='a', start=(3, 4), end=(3, 5), line='c = a + b\r\n')
TokenInfo(type=54 (OP), string='+', start=(3, 6), end=(3, 7), line='c = a + b\r\n')
TokenInfo(type=1 (NAME), string='b', start=(3, 8), end=(3, 9), line='c = a + b\r\n')
TokenInfo(type=4 (NEWLINE), string='\r\n', start=(3, 9), end=(3, 11), line='c = a + b\r\n')
TokenInfo(type=1 (NAME), string='print', start=(4, 0), end=(4, 5), line='print(c)')
TokenInfo(type=54 (OP), string='(', start=(4, 5), end=(4, 6), line='print(c)')
TokenInfo(type=1 (NAME), string='c', start=(4, 6), end=(4, 7), line='print(c)')
TokenInfo(type=54 (OP), string=')', start=(4, 7), end=(4, 8), line='print(c)')
TokenInfo(type=4 (NEWLINE), string='', start=(4, 8), end=(4, 9), line='')
TokenInfo(type=0 (ENDMARKER), string='', start=(5, 0), end=(5, 0), line='')
CPython 会对 tokenize 结果生成一个 parser tree,然后将其转换成 AST
1
2
3
4
5
6
7
import ast
code_str = '''
def hello_world():
    return 'hello world'
'''
node = ast.parse(code_str, mode='exec')
ast.dump(node)
输出
1
"Module(body=[FunctionDef(name='hello_world', args=arguments(posonlyargs=[], args=[], vararg=None, kwonlyargs=[], kw_defaults=[], kwarg=None, defaults=[]), body=[Return(value=Constant(value='hello world', kind=None))], decorator_list=[], returns=None, type_comment=None)], type_ignores=[])"
构建符号表
可以看出 AST 不包含变量的作用域信息,符号表是一个代码块(code block)与上下文(context)中所使用到的名字的集合。符号表的构建过程涉及到对一个代码块中所包含的所有名字以及对这些名字正确作用域赋值的分析。
从 AST 生成 code object
根据 AST 以及符号表中的信息来生成 code object:
- AST 被转化为 python 字节码指令的基础块(basic blocks),基础指令块以及块之间的路径被隐式的表示为图(graph)结构,也称之为控制流图(control flow graph,CFG)
- 以后缀深度优先遍历的方式将前一步生成的控制流图扁平化(flatten)。图被扁平化之后,跳转偏移量被计算出来作为 jump 指令的参数。然后再根据这些指令生成 code object
CFG 生成
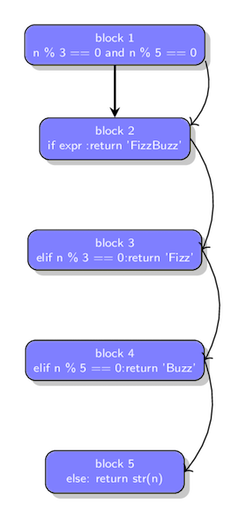
下面的函数转化为 CFG 的结果
1
2
3
4
5
6
7
8
9
def fizzbuzz(n):
    if n % 3 == 0 and n % 5 == 0:
        return 'FizzBuzz'
    elif n % 3 == 0:
        return 'Fizz'
    elif n % 5 == 0:
        return 'Buzz'
    else:
        return str(n)
转化为的 CFG 图大致表示如下
block1 对应的字节码大致为
1
2
3
4
5
6
7
8
9
10
11
             LOAD_FAST
             LOAD_CONST
             BINARY_MODULO
             LOAD_CONST
             COMPARE_OP
             JUMP_IF_FALSE_OR_POP
             LOAD_FAST
             LOAD_CONST
             BINARY_MODULO
             LOAD_CONST
             COMPARE_OP
block2
1
2
3
4
            POP_JUMP_IF_FALSE
            LOAD_CONST
            RETURN_VALUE
            JUMP_FORWARD
block3
1
2
3
4
5
6
7
8
9
             LOAD_FAST
             LOAD_CONST
             BINARY_MODULO
             LOAD_CONST
             COMPARE_OP
             POP_JUMP_IF_FALSE
             LOAD_CONST
             RETURN_VALUE
             JUMP_FORWARD
block5
1
2
3
4
             LOAD_GLOBAL
             LOAD_FAST
             CALL_FUNCTION
             RETURN_VALUE
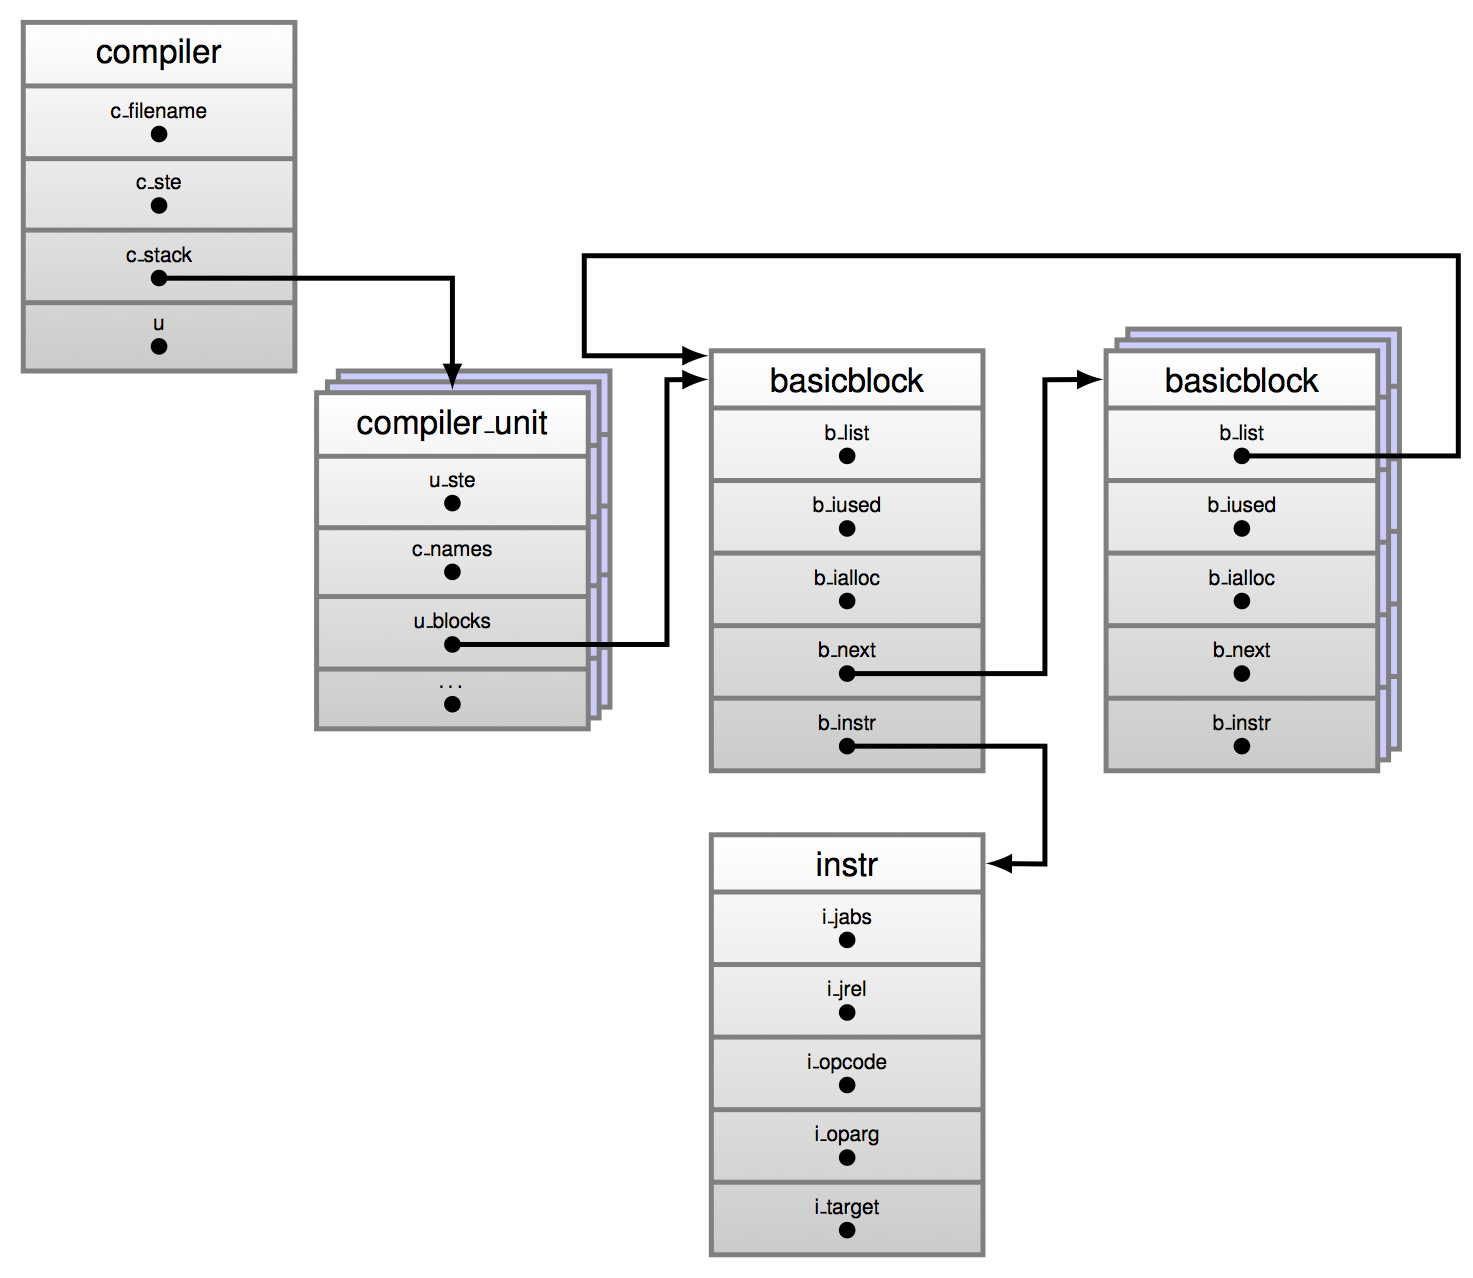
compiler 结构体,每个被编译的模块,对应一个被初始化的 compiler 数据结构。
1
2
3
4
5
6
7
8
9
10
11
12
13
14
15
16
17
18
19
struct compiler {
    PyObject *c_filename;
    struct symtable *c_st;      /*指向之前生成的符号表*/
    PyFutureFeatures *c_future; /* pointer to module's __future__ */
    PyCompilerFlags *c_flags;

    int c_optimize;              /* optimization level */
    int c_interactive;           /* true if in interactive mode */
    int c_nestlevel;

    struct compiler_unit *u;     /* 一个到 compiler unit 结构体的引用。
                                    这个结构体封装了与一个 code block 进行交互所需的信息。
                                    本字段指向目前正在处理的 code block 所对应的 compiler unit */
    PyObject *c_stack;           /* 一个到 compiler unit 栈的引用。
                                    当一个 code block 由多个 code block 所组成时,这个字段负责当遇到一个新的 block 时 compiler unit 结构体的储存与恢复。
                                    当进入一个新的 code block 时,一个新的作用域被创建,然后 compiler_enter_scope() 会将当前的 compiler unit ( *u )push 到栈中。同时 *c_stack 创建一个新的 compiler unit 对象并将其设置为当前compiler unit。
                                    当离开一个 block 的时候,*c_stack 会根据复原状态进行弹出。 */
    PyArena *c_arena;            /* pointer to memory allocation arena */
};
当 AST 被遍历,其中每一个 code block 对应的 compiler_unit 数据结构会被生成,compiler_unit 结构体持有生成一个 code block 对应的字节码指令所需的信息。
1
2
3
4
5
6
7
8
9
10
11
12
13
14
15
16
17
18
19
20
21
22
23
24
25
26
27
28
29
30
31
32
33
34
35
struct compiler_unit {
    PySTEntryObject *u_ste; /*到一个被编译的 code block 中的符号表项的引用*/

    PyObject *u_name;
    PyObject *u_qualname;  /* dot-separated qualified name (lazy) */
    int u_scope_type;

    /* The following fields are dicts that map objects to
       the index of them in co_XXX.      The index is used as
       the argument for opcodes that refer to those collections.
    */
    PyObject *u_consts;    /* all constants */
    PyObject *u_names;     /* all names */
    PyObject *u_varnames;  /* local variables */
    PyObject *u_cellvars;  /* cell variables */
    PyObject *u_freevars;  /* free variables */

    PyObject *u_private;        /* for private name mangling */

    Py_ssize_t u_argcount;        /* number of arguments for block */
    Py_ssize_t u_kwonlyargcount; /* number of keyword only arguments for block */
    /* Pointer to the most recently allocated block.  By following b_list
       members, you can reach all early allocated blocks. */
    basicblock *u_blocks;   /*用于引用那些组成被编译的 code block 的基础块*/
    basicblock *u_curblock; /* pointer to current block 用于引用那些组成被编译的 code block 的基础块 */

    int u_nfblocks;
    struct fblockinfo u_fblock[CO_MAXBLOCKS];

    int u_firstlineno; /* the first lineno of the block */
    int u_lineno;          /* the lineno for the current stmt */
    int u_col_offset;      /* the offset of the current stmt */
    int u_lineno_set;  /* boolean to indicate whether instr
                          has been generated with current lineno */
};
组成 code block 的不同节点在编译过程中会被遍历,根据一个节点类型的不同,判断是否能够起始一个 basic block,不能时会添加新指令到 basic block,能时会创建含有 node 指令的新 basic block,能够起始一个 basic block 的节点类型包括但不限于:
- 函数节点
- 跳转目标
- 异常处理
- 布尔运算等
一个 basic block 是一个具有单一入口与多个出口的指令序列
1
2
3
4
5
6
7
8
9
10
11
12
13
14
15
16
17
18
19
20
21
22
23
24
25
typedef struct basicblock_ {
    /* Each basicblock in a compilation unit is linked via b_list in the
       reverse order that the block are allocated.  b_list points to the next
       block, not to be confused with b_next, which is next by control flow. */
    struct basicblock_ *b_list;
    /* number of instructions used */
    int b_iused;
    /* length of instruction array (b_instr) */
    int b_ialloc;
    /* pointer to an array of instructions, initially NULL */
    struct instr *b_instr;
    /* If b_next is non-NULL, it is a pointer to the next
       block reached by normal control flow.
       引用到一个指令结构体的数组,一个指令结构体对应于一条字节码指令,字节码指令的编号可在头文件 Include/opcode.h 中找到
    */
    struct basicblock_ *b_next;
    /* b_seen is used to perform a DFS of basicblocks. */
    unsigned b_seen : 1;
    /* b_return is true if a RETURN_VALUE opcode is inserted. */
    unsigned b_return : 1;
    /* depth of stack upon entry of block, computed by stackdepth() */
    int b_startdepth;
    /* instruction offset for block, computed by assemble_jump_offsets() */
    int b_offset;
} basicblock;
指令结构体 instr
1
2
3
4
5
6
7
8
struct instr {
    unsigned i_jabs : 1;  // 绝对跳转 jump absolute
    unsigned i_jrel : 1;  // 相对跳转 jump relative
    unsigned char i_opcode;
    int i_oparg;
    struct basicblock_ *i_target; /* target block (if jump instruction) */
    int i_lineno;
};
汇编 basic blocks
一旦 CFG 被生成,basic blocks 包含了字节码指令,但目前这些 blocks 还不是线性排列的。 跳转指令的目标仍是 basic block 而不是指令流中的绝对偏移量。 assemble 函数将会把 CFG 进行线性排列并生成 code object。 assemble以“后序深度优先(post-order deep first)”的方式遍历 CFG 图,以对它进行扁平化。后序遍历指的是在遍历时先访问所有的子节点再访问根节点  在对一个图进行后序深度优先遍历时,我们首先会递归地访问一个根结点的左子节点,然后是右子节点,然后才是这个根节点自己。比如以上面这个图结构作为例子,当我们以后序深度优先遍历对它进行扁平化的时候,对节点的访问顺序是:H -> D -> I -> J -> E -> B -> K -> L -> F -> G -> C -> A 。如果是前序(pre-order)遍历的话:A -> B -> D -> H -> E -> I -> J -> C -> F -> K -> L -> G 。而如果是中序(in-order)遍历:H -> D -> B -> I -> E -> J -> A -> K -> L -> F -> C -> G 。 上面fizzbuzz 函数的 CFG,如果对它进行后序遍历,顺序是:block5 -> block4 -> block3 -> block2 -> block1。 当 CFG 被扁平化以后,按照指令字节数计算扁平化图的跳转指令的跳转偏移量。 当字节码生成完毕,code object 对象就可以根据这些字节码以及符号表中的信息进行生成,code object 对象返回给调用函数的时候,整个编译过程就在此结束了。

